|
关于灯光贴图,烘焙贴图如何在unity3d中导入及使用的基本教程。很不错。 Hello. I just wanna share my way on doing Lightmap in 3dsmax to unity. I read many post asking how to do this, and I want to share with all of you. Please tell me if there is a better way. 1. When you finish uvw your model save it to .uvw file 2. Create new uvw and change it to channel 2. Load the uvw you created earlier. This give you better result than using automatic uvw. 3. hit (0) to open the render to texture window. Select "Use Existing Channel", change the Channel to "2", choose add "Lightingmap". The image you see when rendering is not the real result. The real image was stored in your 3dsmax folder. usually it stored like this (My Documents/3dsmax/sceneassets/images) look for your model name with "LightingMap" on the back. Usually a TGA file like this. 4. The easier way is to "Pick Material from Object" and then copy the "Baked Material" to an empty slot. Because .fbx exporter currently doesn't support "Shell Material". 5. After you assign the new baked material to the model, export the model with fbx extension. Here I use cm, embed textures, convert to portable format (TIFF). 6. When you open your unity project, and Import the model, you will see it's only the diffuse texture that was exported from 3dsmax. And no LightMap texture. My way is to import the LightMap texture that 3dsmax stored in (My Documents/3dsmax/sceneassets/images). And then add it into fbm folder of your model. 7. After that done. Change your model material to a Lightmapped material. And add the Lightmap texture into the slot. Hoorayyy..!!!
第二部分 "Here it is!! Lightmap with tilling textures" First let me explain, I am using 2 different way of using Lightmap for this one. You know why later on. 1. Here I have 2 objects (interior, and sofa). I highlighted the texture so you can see them clearly. There are 8 textures (7 for interior and 1 for sofa). 2. Unwrap UVW set (ch 1) hit save. 3. Unwrap UVW set (ch 2) load from the first channel. 4. In Baked Material option, choose "Output into Source" and "Keep Baked Materials". This option will automatically update your original material without using a shell material again. Thanks to holmeren for the update ^^. Hit (0) for render to texture window. --> result
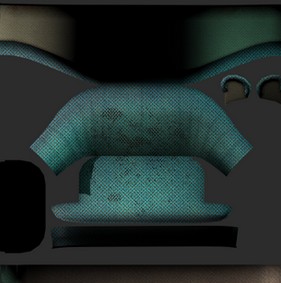
5. Repeat the process for the sofa. (Explained on top of this page). Hit M to and see your new baked material (Check it out! the "Self Illumination Slot" is now containing the Lighting Map texture. 6. Export to FBX 7. Open Unity and import the asset. Because in 3dsmax we use 8 texture for the model, so unity will assign them into 8 materials. As usual the lightmap textures aren't exported along with them. Import manually the lightmap texture from your 3dsmax folder (MyDocuments/3dsmax/sceneassets/images) look for your model name with LightingMap on the back. In this case I have 2 (sofaLightingMap.TGA, and wallLightingMap.TGA). 8. With all our texture assembled, we are now ready to change the default material into "Lightmapped" material. I choose Lighmapped/VertexLit. Assign the correct lightmap texture to the correct material model.
Yess!! The Lightmap placed correctly.
9. Time to "tilling" our interior textures.
Yes!! Finish!!
----------------------------------------------------
---------------------------------------------------- What if I want to use non tilling texture along with the tilling textures? Well I came across some error in exporting as well but I found a way to get that done. <Different solution> 1. The uvw I use is the same as before. Only this time with different texture for the wall. (1 for the wall, 1 for the floor, and 1 for the sofa). The wall texture
2. Exporting as usual. 3. Import them into Unity and change the diffuse material to Lightmapped material. 4. Apply the Lightmap texture, and tile only the floor texture. 5. Finish!! ----------------------------------------------------
---------------------------------------------------- Conclusion...and problems First method: We will have lot of material in our mesh because we assign a lot of different texture in one model. Smaller textures but with sharper image, thanks to the tilling system. Add 30 kb.Mat Second method: We use less material and less texture, but with bigger resolution (my custom texture wall have 512x512 resolution). Add 11 kb .Mat I don't know the performance difference between those two. So if anyone can share your opinion, I'd be most grateful. So that finished my small lighting map tutorial. Good Luck on your project, (mine too hehe) and Thank you very much to Unity3D team. Cheers.
| 


 窥视卡
窥视卡 雷达卡
雷达卡 发表于 2012-12-16 15:01
 提升卡
提升卡 置顶卡
置顶卡 沉默卡
沉默卡 喧嚣卡
喧嚣卡 变色卡
变色卡 千斤顶
千斤顶 显身卡
显身卡