|
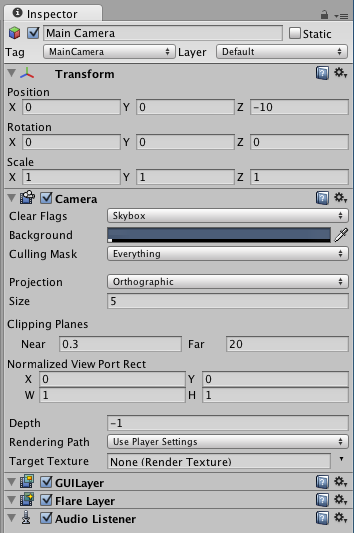
One of my goals for 2011 is to write at least one new blog post every week. I’m going to kick off that goal this week by starting a multi-part series on creating 2D games with Unity3D. Please feel free to add comments below, especially if you have insight or questions about making 2D games with Unity3D. IntroductionThere are tons of different ways to handle creating 2D games in Unity3D. One way would be to make “flat” 3D objects in a 3D modeling package like Maya. Another way would be to create 2D images (sprites) in an image editing program like Photoshop. This series will cover creating 2D games using Sprites for the visuals and 3D objects (either Unity GameObjects or more complex objects created in Maya) for collision. This first article covers the basic tools you’ll need, some basic concepts, and initial camera and scene setup. ToolsFor sprites, I use Sprite Manager 2 which is a 3rd party Unity plugin – you can purchase SM2 on the Above and Beyond Software website or from the Unity Asset Store. As I write this, SM2 is currently selling for $150 but it’s well worth the price if you’re looking to make a few 2D games in Unity, especially if you’re making games for iPhone. I’ve used it on all but one of my games (it wasn’t out yet when I made Holeshot). Even if you’re not making 2D games, SM2 is great for making 2D user interfaces like heads up displays, front end menu systems, and in-game pause menus. There is also a free version of Sprite Manager which you can read about in this Unity Forum post. I’ve never used it and I suspect it’s not as easy to setup as SM2 and it likely doesn’t have all the latest features of SM2, but it should be enough to get you going with 2D sprites in Unity if you’re on a tight budget. There’s a Sprite Manager tutorial on 3D Buzz (registration required) that should be helpful with getting started with the free version. Be sure to watch the tutorial videos on the AndB website as they’re loaded with information on how to use SM2. Before I get into the Unity side of 2D games, I also want to mention iTween which is “is a simple, powerful and easy to use animation system for Unity.” iTween isn’t specifically 2D or 3D, but more of a general purpose tweening solution (similar to what you might be used to using if you’re coming from a Flash background). I plan to cover using iTween later in the series. Main Camera[/url]When making 2D games, you’ll typically want to set your Camera’s Projection to Orthographic rather than perspective, which will give you a flat 2D view of the scene. When setting the camera to Orthographic, you’ll be giving up some of the “automatic parallax” effect that you can achieve with a Perspective camera. But you’ll gain pixel perfect sprites and a much easier scene to deal with in 2D, plus you can still get parallax in your scene by moving background layers at different speeds. You can read more about the [url=http://forum.unity3d.com/threads/26596-Orthographic-always-better-for-2D]perspective/orthographic parallax debate in this Unity forum thread. The next thing you’ll want to do is to set the Camera’s Size to a number that will give you a 1:1 pixel texture ratio between Photoshop and Unity. For example, if your game’s Resolution (Edit -> Project Settings -> Player: Resolution) is set to 480×320 and your Camera Size is set to 5, then a default Unity cube (GameObject – Create Other -> Cube) at Scale 1, 1, 1 will be 32 pixels square in photoshop. You can test this by taking a screen shot of your Unity game view (not the Scene view), open it in Photoshop and measure the size of the cube (be sure you have your Units set to Pixels in PS). If you double your project’s resolution to 960×640 and leave the Camera Scale set to 5, then a Cube in Unity at Scale 1, 1, 1 will be **×** pixels in Photoshop. If you want to maintain that 32 pixel cube size, then you would set the Camera Scale to 10 – this basically moves the camera 5 additional units away from the scene causing the Cube to appear smaller. You will have to perform your own calculations for your game depending on the resolution you want to use, how big you want the characters on the screen, etc. I personally like to have a 24 pixel tall character appear exactly 24 pixels tall in the Unity game scene without having to do any kind of additional scaling in Unity. I always leave the Main Camera set to the default position that it’s at when the scene is created except that by default the camera’s Y position = 1, set that to zero just so the view is center. When you have your camera set to Orthographic, the Z translation does nothing – you can set the distance with the Size field as I mentioned above. Also if you move your sprites forward or backward on the Z axis, they won’t appear physically bigger or smaller in the game view – however positioning sprites on the Z-axis is important for “layering” sprites in the scene – sprites that are closer to the camera will appear in front of sprites that are further from the camera (more on this later in the series). Ambient LightingTypically 2D games don’t use any kind of real-time lighting, so you may want to adjust the Ambient Light to fully bright. By default, Unity scenes have the Ambient Light set to a dark gray color – change this to full bright by going to Edit -> Render Settings and then click on the dark gray colored bar next to “Ambient Light” to open the color picker. In the color picker, set all the values to 255. This will give you a fully bright scene that is unaffected by light and all of your sprites will appear in the game exactly as they look in Photoshop. CollisionYou’ll still use 3D GameObjects for collision in your 2D game (Unity is a 3D engine after all). But you can also make 2D collision objects in Maya or any other 3D package if you need to make exact collision shapes to match your 2D art. I plan to cover this in more detail later in the series. Unity’s Built-in 2D ObjectsOther than sprites created with SM2, there are some 2D elements built into Unity3D including GUI Texture, GUI Text and 3D Text. I don’t ever use GUI Texture since I use Sprite Manager. Some of the Unity Tutorials use GUI Texture for the joysticks since there’s a way in script to use them for touch detection. I use GUI Text for all of my UI and HUD elements unless I’m doing fancy texture-based graphical buttons – for those I use sprites but of course that makes it harder to localize if you ever want to go down that road. For stuff like HUD scores, ammo counts, anything with numbers that are always changing, then use GUI Text. If you need to have text display at arbitrary positions in the game world – like if you want scores to pop off a dead guys head, then use 3D Text for those. I’ll cover the details on using these later in the series. ConclusionThat’s all for part 1 of the series. I would like to make this series as useful as possible, so if you have questions or comments or if you spotted an error, please respond below and I’ll be sure to work your suggestions into the series.
转自:http://www.rocket5studios.com
| 


 窥视卡
窥视卡 雷达卡
雷达卡 发表于 2012-12-18 22:00
 提升卡
提升卡 置顶卡
置顶卡 沉默卡
沉默卡 喧嚣卡
喧嚣卡 变色卡
变色卡 千斤顶
千斤顶 显身卡
显身卡