|
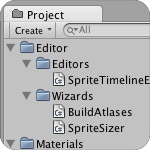
This is part 2 of a multi-part series on making 2D games with Unity3D. Part 1covered the basic tools you’ll need, some basic concepts, and initial camera and scene setup. Part 2 focuses mostly on the Sprite Manager 2 workflow including some tips and tricks. I should probably mention that I’m not affiliated with A and B Soft (makers of Sprite Manager 2), SM2 just happens to be the best tool I know of for working with sprites in Unity3D. That said, the remainder of this series will focus heavily on SM2 so you may want to get it if you’re not already using it. If you haven’t already watched the SM2 tutorials on the A and B Soft website yet, you should check them out. SM2 seems a little tricky at first, but once you get the hang of it it’s easy to use and a huge time saver. Also I should mention that I’m using Sprite Manager 2 version 1.8 and Unity 3D version 3.1. Installing Sprite Manager 2SM2 comes bundled as a .unitypackage file. There are 2 ways to add these into your project, I’ll go over both methods. First create a new project in Unity (File -> New Project) or if you’re adding SM2 to a project you’ve already started, that’s cool too (and likely a common scenario). Method 1) In Unity go to Assets -> Import Package and then browse to the location of the SM2 1.8.unitypackage (note you may be using a different version, that’s totally fine). Select the SM2 1.8.unitypackage and then click the Open button. Method 2) Browse to the location of the SM2 1.8.unitypackage on your hard drive and double-click the file to open it – the package should automatically open in Unity. When using either of the two methods described above, the “Importing package” window will appear in Unity which lists all of the files in the package. On the Importing package screen, make sure all of the little boxes on the left are checked (which they should be by default) and then click the “Import” button in the lower right hand corner of the window. Assuming you’re starting from a clean project, you should now have the following folders in your Project view: Editor, Materials, Plugins and Shaders. Some of those have subfolders as well and all of them contain SM2 related files. Check out this image to see what your Project folder should look like (again, assuming there wasn’t anything else already in your project). Upgrading Sprite Manager 2SM2 is regularly updated by the author to fix bugs and add new features. When upgrading to a new version of SM2, it’s best to delete all of the previous version’s files from your Project before installing the updated package. Be careful with this – make sure you’re not deleting files that aren’t related to SM2 or any SM2 files that you may have modified (you might have changed attributes on the Sprite Material or the Shaders for example). Also make sure you don’t just delete the entire Editor or Plugins folder if you’ve imported other scripts or plugins into your Project that live in those folders. Refer to this image to see exactly what was added when you installed SM2 and only remove only those files before upgrading. It’s certainly not an ideal workflow, but it should go smoothly if you’re careful. Creating TexturesI save all of my textures as .png files from Photoshop into a folder named Sprites in my Unity project’s Asset folder (eg Assets/Sprites). After saving the file, switch to Unity and find it in the Project panel in the Sprites folder (assuming that’s where you saved it). Now you’re going to need to make some changes to the Texture Import settings: Select the texture in Unity, then in the Inspector under Texture Importer set the following: - Texture Type: Advanced
- Non Power of 2: None
- Generate Mip Maps: uncheck (since you’re probably not going to be moving the camera in/out in your 2D game, this will keep the file size smaller)
- Override for iPhone: leave this unchecked.
Click Apply. Now if you look at the Preview window in the Inspector (with your sprite still selected), you should see information like “24×24 (NPOT) ARGB 32 bit 2.2 KB”. SM2 requires textures to be either ARGB32, RGB24 or Alpha8. If you use the “Override for iPhone” option and set it to something like “RGBA 32 bit”, you’ll get errors when you Build Atlases. If you did happen to use those override settings, just uncheck the Override box, click Apply and you should see the file is set back to ARGB 32 bit. If you have a lot of textures, changing the attributes on each one (as described above) can be a tedious process. Thankfully there’s an awesome script on the unifiycommuntiy Wiki that provides a way to change the import settings on several textures at once. Follow the instructions on the wiki page to add the script to your project. Once you have the script, do the following: - Select 1 or more textures in the Project view
- Custom -> Texture -> Change Non Power of 2 -> None
- Once those settings are applied, the textures will automatically deselect. Select them again in the Project view
- Custom -> Change MipMap -> Disable MipMap
Creating A Sprite With SM2Here are the steps I use to create a new sprite: - GameObject -> Create Empty
- zero out the x,y,z Position (not required, but helpful)
- Component -> Scripts -> Packed Sprite (this will add SM2′s Packed Sprite script to the GameObject)
- Window -> Sprite Timeline (opens SM2′s Sprite Timeline window)
- With the empty game object still selected, drag the texture (with the settings from above) into the Static Texture field in the Sprite Timeline window.
- Drag & Drop the Sprite Material from the Materials folder onto the object or into the inspector window (if it’s still selected)
- Check “Pixel Perfect” and “Auto Resize” under Packed Sprite on the object
- Custom -> Build Atlases (I typically use the default settings)
- Press Play to see the sprite appear properly sized. Note if you had the Sprite Timeline open in front of the game view when you press Play, the sprite might appear smaller than it should in the Game view. Make sure the Game panel is on top and press Play again to see it properly.
If you’re making an animated sprite, add these steps between Step 5 and 6 above: 5a. In the Spite Timeline editor, click +, and give it a Name (eg. walkright) which can later be referenced in script.
5b. Drag your animation frame(s) from your Sprites folder into the light gray bar under the Static Texture area. You can drag them one at a time or many at once.
5c. Set the FPS to whatever is appropriate for your animation (eg 24),
5d. If you intend your animation to loop, then put -1 in the Loop Cycles field. Sprite AtlasesThe first time you Build Atlases, a new folder will be automatically created in your Project named “Sprite Atlases” and a new Texture will be created in the folder called “Sprite Material”. The name of the Atlas is based on the Material name – so if you had assigned a Material called “Sprite Material Player” to your Packed Sprite in Step #6 above, then there would be a new Texture in that folder called “Sprite Material Player”. You can have as many sprite materials and corresponding sprite atlases as you want – for example you can have a material/atlas for the player, for the user interface and for the backgrounds. But keep in mind that each Atlas = 1 additional draw call so it’s best to try to fit all of your textures onto as few Atlases as possible to keep draw calls low. However you need to balance draw calls vs. texture size – the more textures you assign to an Altas, the larger it will get. A 1024×1024 Sprite Atlas might be 2MB or more. If you’re trying to keep your app size down and have some draw calls to spare, then you could distribute textures onto another Atlas so that you end up with 2 smaller Atlases which may end up taking up less disk space (your milage may vary). You should also make sure that your newly created Sprite Atlas isn’t compressed as nothing will make your 2D game look worse than compressed textures (again, your milage may vary depending on your projects needs). - In the Project panel, select the Sprite Material that’s in the Sprite Atlases folder (not the one in the Materials folder)
- Override for iPhone: Checked
- Format: Truecolor (note the options here may be different for different platforms, just make sure it’s not set to “compressed”).
Playing The Animation In ScriptHere’s a simple javascript example of how you’d play that animation:
== var characterSprite : PackedSprite;
function Update() {
if(Input.GetMouseButtonDown(0)) {
WalkRight();
}
function WalkRight() {
characterSprite.PlayAnim(0);
} Update: One of our readers wanted to know how to make the character walk right/left and play corresponding walk right/left animations. Here’s a simple C# script which will move the player left or right when you press the left or right arrow keys and will also play the left or right walking animations (you’ll need your own walking animations) on the player. - Create a new script and name it Controls.cs
- Copy the script below and paste it into Controls.cs
- Follow the steps above section titled “Creating A Sprite With SM2″
- Drag the Controls.cs script on to your player sprite game object
- Assign the playerSprite to the script by dragging it onto the playerSprite field into the inspector.
== public class Controls : MonoBehaviour {
public PackedSprite playerSprite; // assign your sprite to this in Unity
public float moveSpeed = 2f;
private float movement;
void Update() {
movement = Input.GetAxis("Horizontal") * moveSpeed;
movement *= Time.deltaTime;
transform.Translate(movement,0.0f, 0.0f); // move player along X axis
// move right
if(movement > 0.02f) {
playerSprite.PlayAnim(0);
}
// move left
if(movement < -0.02f) {
playerSprite.PlayAnim(1);
}
}
} == In part 3 of this series, I'll go into more detail on playing different animations on a character. Creating PrefabsOnce you've created a new sprite and built the atlases at least once, you should make a prefab out of it. The reason you want to have your sprite objects in prefabs is important if you have a game that has multiple Scenes each with SM2 sprites in them - the sprite builder can't talk to sprites in other scenes so when you rebuild atlases in one scene, you can destroy the sprite mappings on object in other scenes. But if all of your objects containing sprites are on prefabs, then they will be updated when you Build Atlases (I think the Scan Project Folder box needs to be checked in order to update prefabs). - In the Project view, create a new folder and name it Prefabs
- Change the name of the prefab (eg. Player)
- Drag the Player gameobject from the Hierarchy view onto the Player prefab in the Project view. You'll know it worked if the object in the Hierarchy view turns blue and the little cube icon on the prefab turns blue too.
Note that any time you make changes to your prefab (like if you add a script or add components or add more sprite animations), in most cases you'll "break the prefab reference". Don't worry about that, just make your changes and when you're done drag the object onto the prefab again as described in Step 3. Sometimes your changes won't break the connection, but you'll still want to update the prefab - to do this select the object in the Hierarchy, go to Game Object -> Apply Changes to Prefabs. Thoughts On File SizeUsing Sprite Manager *should* actually keep your file sizes smaller than they would be if you just built the scene out of individual textures since each texture is being added to a single Sprite Atlas and extra empty space is being trimmed between them. Your individual textures in your Sprites folder actually aren't even part of the build once they're assigned to the Sprite Material's sprite atlas. But the best reason to use SM2 is that all of the sprites on a single spriteatlas will = just 1 draw call in the engine rather than a draw call for each individual texture if you placed them in the scene individually (this is especially important on mobile devices). ConclusionThat's all for part 2 of the series. As always, my aim is to make these posts as useful as possible so please use the comments area below if you spot any errors, have questions or suggestions for future posts or if you just want to say "hi". In the next installment I'm planning to go through the process of creating a simple 2D platformer game.
| 


 窥视卡
窥视卡 雷达卡
雷达卡 发表于 2012-12-18 22:02
 提升卡
提升卡 置顶卡
置顶卡 沉默卡
沉默卡 喧嚣卡
喧嚣卡 变色卡
变色卡 千斤顶
千斤顶 显身卡
显身卡