|
|
资源信息 Asset Information
| 资源名称: | Modular City Alley Pack (发帖教程) |
| 版本: | 1.1 (版本) |
| 资源等级: | 6 |
| 资源格式: | .unitypackage (链接失效请点击帖子右下方举报通知管理员) |
|---|
| 资源大小: | 504.6MB (默认:MB) |
|---|
| 下载地址: | 请先登录 (购买积分) |
|---|
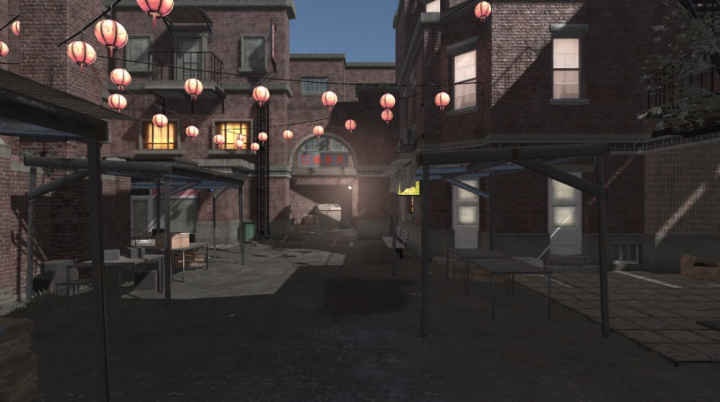

Modular City Alley Pack
Example scenes uses Standard Assets packs to give it a better look and playable possibilities.
Standard assets used are characters pack for firstpersoncharacter controller,
Effects pack for some camera effects and Cinematic Image Effects downloaded from unity asset store for more camera effects.
If you do not wish to import these effects please do not import the Standard Assets and Editor Folders to your project.
v1.1
- Added Props and materials:
- Awnings: AwningBlue, AwningStipes, Sign_Beer, Sign_China
- TrashSet: DumpsterOpen, Pallet
- Added more large wall pieces.
- Added Daytime Example scene.
Preview video: https://www.youtube.com/watch?v=VwgESKlj4rU
Tutorial video: https://youtu.be/43nzTYketOc
Webplayer playable demo Link: http://www.finwardstudios.com/AlleyPack/Alleypack_Example.html
Main Features:
- Build alleys and streets and populate them with props.
- Everything you see in the demo or videos are included.
- Package contains over 350 prefabs.
- Over 210 wall and floor pieces with swappable material possibilities.
- Over 110 high detailed unique props.
- Premade prefabs from every object with colliders.
- Snap to grid, light flicker and light optimization scripts included.
- Fast Create walls and floors with snap to grid tool. (ctrl + L to open snap options)
- Change wall and floor look easily by changing simply materials.
- Example scene included.
- Prefabs scene inlcuded.
Creating Walls/Buildings:
- Choose a wall type folder and one of the subgroups and drag a prefab to scene.
- Type A is a basic Wall.
- Type B has a concrete part on bottom.
- Type C has a concrete part on bottom and different kind on top.
- Type D is a basic wall but is higher.
- Press control + L to open snap to grid options. All pieces should snap next to eachother
with a value of 0.5, 0.5, 0.5 and angle of 90 deg. Transform gizmo needs to be set to Pivot and rotation to Local or the snap doesn't work.
- Use corners and pilars to add depth to your buildings.
- Once you have created a building you like, you can select the wall pieces
and change the Wall_ material to a different one if you like. All tiled wall materials start with Wall_ prefix.
- Use roofs folder to add metalplate roof or you can use floor pieces such as midfloor or sidewalk pieces.
Creating floors:
- Street pieces are a little bit lower than sidewalk pieces so use sidewalk pieces next to walls
or else there will be a gap between walls and the ground. Use snap to place these pieces aswell.
There is a little bit over 0.1 unit gab between street and sidewalk pieces.
- Use stonepavements to add a nicer transition between sidewalks and streets.
- Again you can select sidewalks or street pieces and change the materials. Floor materials start with Floor_ prefix.
Notes and Tips:
You need to use LINEAR COLOR SPACE to get best results and Deferred Rendering Path.
Change them from Player Settings.
When using directional light, to fix the light coming throug backside of the wall pieces, simply select all wallpieces and change
from Mesh renderer settings to Cast shadows two sided.
To change height of the street or sidewalk you can use stairs or hill pieces.
I recommend you play for a while with these pieces so you get more familiar with them and you will be able
to create much faster the type of buildings you want.
When you have a building you like and you like to use it more often, you can create an empty gameobject and drag the wall pieces to be the gameobject's children.
Then you can make a prefab out of it. Same goes for roads.
Because of static batching you don't need to combine all meshes together, unity does it for you. You just have to remember to bake occlusion data.
I recommend to bake occlusion culling for better performace and bake lightning to make the scene look better.
You can add LightFlicker script to lights you wan't to be realtime lights and adjust the parameters to get a flickering you like. You can add
light optimize script and change the parameter to shut down the light at a distance from player for better performance.
One or more textures on this 3D-model have been created with images from Textures.com.
These images may not be redistributed by default. Please visit www.textures.com for more information.
If you have any questions or want to give feedback please send email to support@finwardstudios.com
Thank you.
===
模块化城市街道包
示例场景使用标准资产包给它一个更好的外观和可玩的可能性。
使用的标准资产是firstpersoncharacter控制器的字符包,
效果包为一些相机效果和电影图像效果下载从unity资产商店为更多的相机效果。
如果您不希望导入这些效果,请不要将标准资产和编辑器文件夹导入到您的项目。
v1.1
-添加道具和材料:
-遮阳篷:蓝色遮阳篷,蓝色遮阳篷,标志啤酒,标志中国
-垃圾:垃圾箱打开,托盘
-增加更多的大型墙体。
-添加了白天的例子场景。
预览的视频:https://www.youtube.com/watch?v=VwgESKlj4rU
教程的视频:https://youtu.be/43nzTYketOc
Webplayer可播放演示链接:http://www.finwardstudios.com/AlleyPack/Alleypack_Example.html
主要特点:
-建造小巷和街道,并用道具填充。
-你在演示或视频中看到的一切都包括在内。
-包包含超过350个预制件。
-超过210件可更换材料的墙壁和地板。
-超过110高细节独特的道具。
-从每个物体与碰撞器预制预制。
-快速网格,灯光闪烁和灯光优化脚本包括。
-快速创建墙壁和地板与snap to grid工具。(ctrl + L打开吸附选项)
-改变墙壁和地板看起来很容易,只需改变简单的材料。
-示例场景包括。
-预置场景。
创建墙壁/建筑:
-选择一个墙壁类型的文件夹和其中一个子组,并拖拽预制件到场景。
- A型为基本墙。
- B型底部有混凝土部分。
- C型底部有混凝土部分,顶部有不同类型。
- D型为基础墙,但较高。
-按control + L打开对齐网格选项。所有的部件都应该紧挨着对方
值为0.5、0.5、0.5,角度为90度。Transform gizmo需要设置为旋转到本地,否则snap就不能工作。
-使用角和柱来增加建筑物的深度。
-一旦你创建了一个你喜欢的建筑,你可以选择墙壁的部分
如果你喜欢的话,可以把墙的材质换一种。所有瓷砖墙材料都以Wall_开头。
-使用屋顶文件夹添加金属板屋顶或你可以使用地板片,如中间地板或人行道片。
创建层:
-街道的部分比人行道的部分要低一些,所以要把人行道的部分靠近墙壁
否则墙与地之间就会有空隙。也可以使用snap来放置这些碎片。
在街道和人行道之间有一点点超过0.1单位的单位面积。
-在人行道和街道之间使用石墙来增加一个更好的过渡。
-同样,你可以选择人行道或街道,并改变材料。地板材料以Floor_开头。
笔记和提示:
你需要使用线性的颜色空间来获得最好的结果和递延的渲染路径。
从玩家设置中改变它们。
当使用方向光时,要修复穿过墙片背面的光线,只需选择所有的墙片并改变
从网格渲染器设置投射两面阴影。
要改变街道或人行道的高度,你可以使用楼梯或小山块。
我建议你们用这些曲子演奏一段时间,这样你们就会更熟悉它们,你们就会有能力
更快地创建你想要的建筑类型。
当你有一个你喜欢的建筑并且你喜欢经常使用它时,你可以创建一个空的gameobject并拖拽墙壁碎片成为gameobject的子对象。
然后你可以用它做一个预制件。道路也是如此。
因为静态批处理,你不需要把所有的网格组合在一起,unity为你做到了。你只需要记住烘烤遮挡数据。
我建议烘焙遮挡剔除以获得更好的效果,烘焙闪电以使场景看起来更好。
您可以添加LightFlicker脚本,灯光你不想是实时灯光,并调整参数,以获得您喜欢的闪烁。您可以添加
灯光优化脚本和改变参数关闭灯光在距离播放器更好的性能。
这个3d模型上的一个或多个纹理是由来自Textures.com的图片创建的。
默认情况下,这些映像可能不会重新分发。请访问www.textures.com了解更多信息。
如果您有任何问题或想给予反馈,请发送电子邮件至support@finwardstudios.com
谢谢你! |
本帖子中包含更多资源
您需要 登录 才可以下载或查看,没有账号?立即注册
×
|

 窥视卡
窥视卡 雷达卡
雷达卡 发表于 2020-8-17 08:00
 提升卡
提升卡 置顶卡
置顶卡 沉默卡
沉默卡 喧嚣卡
喧嚣卡 变色卡
变色卡 千斤顶
千斤顶 显身卡
显身卡