|
unity3d 3.0之后内建的Beast Lightmap Engine烘焙系统还是非常实用和高效的,不过似乎效果并没有专业三维软件烘焙出来的效果好,其实不然,老外发布的这篇教程,就主要讲解了如何更好的利用Beast Lightmap Engine系统来进行灯光阴影的烘焙!推荐阅读学习!
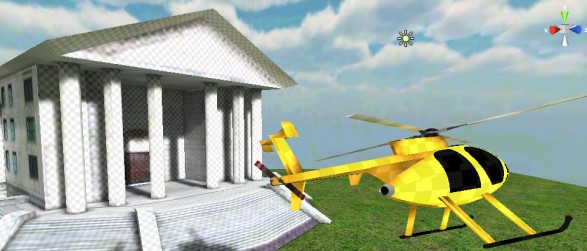
One of the coolest features of Unity3D is the addition of Beast Lightmap Engine! In short, you can do global illumination (bake shadows/light) right there in the Unity IDE. And if you haven’t heard about this feature yet, then you’re about to have a “moment” (get some tissues, for slobbering/weaping etc). And check out their in-depth explanation of the Lightmapping interface here This is very very cool indeed! With some basic settings, you can really increase the appeal of your game’s scenes using Beast within Unity3D. Not only that, but in terms of performance, especially on an iPad/iPhone, it’s invaluable. Ok, great – so now that I have your attention, what’s this post about? It’s about lightmapping, haven’t you been paying attention?!? Ok, more directly, this post focuses on how to get quick bakes and what has the most impact on a bake time. THE *WHY*When you first jump into lightmapping, you really just want to “see” something immediately to get a sense of what you can adjust to get what you want out of it. [/url]Stunt-Copter - no lightmapping [url=http://content.screencast.com/users/neoRiley/folders/Jing/media/4858e823-ad93-4666-9a12-af83a9935d09/00002711.png]With Lightmapping I’m going to do a simple scene with a helicopter from my new game called “Stunt-Copter” to give you an idea of what impacts your wait time, and what gives you the quality you might be after. What takes so long?There are two things that affect the bake time most: 1) Resolution and 2) Final Gather Rays. I’ve personally found that Resolution affects the bake time more than Final Gather Rays does. Obviously, the higher the resolution, the better quality you’ll get with the shading – but you’ll also wait longer.  Waiting longer is fine for final game touches, but during the development time, it’s necessary to get a scene with some lighting going so that you can make your best decisions as you go along. Or maybe you’re just tired of looking at your unlit scene, like the one above. Waiting longer is fine for final game touches, but during the development time, it’s necessary to get a scene with some lighting going so that you can make your best decisions as you go along. Or maybe you’re just tired of looking at your unlit scene, like the one above.  Getting a Quick Bake[/url]let’s start off with how this scene is setup, then we can take a look at some basic settings. First, the models you’ve imported have to have “Generate Lightmap UVs” checked and reimported. What this does is add a second UV channel to your model’s existing set of UVs. For lightmapping to work properly, the faces of the model can’t have any overlapping or shared areas in the UVs Second, the building, ground, landingPad and helicopter are all marked as “static”.[url=http://content.screencast.com/users/neoRiley/folders/Jing/media/8e329401-ab1d-454a-9e0d-627b7928d0b6/00002700.png] This is how the light map engine identifies what will be baked and what won’t. Now, in this scene, I’ve marked the helicopter as static so that we can see the nice shadow on the ground and the ambient occlusion on the heli itself. In one of the other screenshots, you’ll also see how the color of the body and the green from the grass is baked into the under side of the blades on top, which is extremely cool – but that’s another discussion. Now, the other thing we need to do is put a directional light into the scene and mark it as “BakedOnly” in the Lightmapping selection at the bottom of the light’s property inspector panel. Then, you’ll need to select the “Shadow Type” and set it to “soft shadows”. The only other thing I changed here was the quality – instead of using the settings in the quality settings, I changed it to “Low Resolution”. This actually saved me 8 seconds in the bake time and I couldn’t tell a difference in the shadows. See below: [/url]High Quality - 2:12 [url=http://content.screencast.com/users/neoRiley/folders/Jing/media/dd30a325-9500-42d2-a9aa-0a1f72913c02/00002701.png]Low Quality - 2:04 [/url]Lightmapping settings Now we need to set the lightmapping settings. Here’s a screenshot (which I always appreciate) of the settings I used in this example. I’ve set the Final Ray Gather to 200 and the Resolution to 10. I’ve also set my skylight intensity to .25 and changed the color from the blue tint to a gray tint. I know *why* they put it as blue, I just don’t think it looks good, so I set it to a shade of light gray. That’s probably just me though  Ambient Occlusion is set all the way to 1 as is bounces. Other than that, I didn’t touch anything else. At this point, if you’ve set everything up correctly, you should be able to get a quick and dirty bake in a very reasonable amount of time. Ambient Occlusion is set all the way to 1 as is bounces. Other than that, I didn’t touch anything else. At this point, if you’ve set everything up correctly, you should be able to get a quick and dirty bake in a very reasonable amount of time. Saving time like this is a big deal when you’re trying to make “best guess” decisions on your project in the earliest stages. Now, in the final output, you’ll notice the ambient occlusion on the pillars of the building as it meets the floor and ceiling. Event at 10 texels this looks fairly decent and certainly gives us a good enough hint about how the final render will look. While the building looks good, the helicopter doesn’t look nearly as good unfortunately. Resolution : 10 texels Let’s take a look at the texels first, then take a look at the helicopter closely. In this next shot, we see the building in the background and the helicopter up close with the resolution squares showing. The building looks to have many more than the helicopter. The helicopter’s texels are much larger across it’s faces as well. So when this scene is baked, the building’s shadows actually look fairly decent, but the helicopter’s really pretty terrible. If you look closely, there’s no sign of ambient occlusion and the shadows are not distinct at all. Which, is what we asked for with all of our low quality settings for the sake of speed, right? This really is ok for now since all we really needed to get was a fair indication of how the scene was going to look lightmapped. One other example I’ll show you is “Copteropolis” from Stunt-Copter. This was a perfect example of needing to get a quick bake on a very large city scene. In all, this bake took 1 hour. It was well worth the wait so that I could continue working on other aspects of the game, especially considering that one “high quality” bake took well over 6hrs! I may have gone off the deep end with some of the settings, but you get the point  Copteropolis, the city of Stunt-Copter (iPad Game) Higher Quality[url=http://content.screencast.com/users/neoRiley/folders/Jing/media/f7353209-2643-4cf4-81ee-3e96b34266c5/00002705.png]200 Final Gather Ray count Ok, so now that we know how to get quick one-off, let’s look at this scene with a bit more focus on the Helicopter and it’s details. In this next shot, we’re much closer to the helicopter so we can see how big the texels are as we go along. Note also, the light/color emission of the yellow body onto not only the white blades above, but it’s own body where the tail meets the main part of the body. But one thing we’re missing as I said before is the ambient occlusion on the joints where there are hard angles, as well as fairly clear shading on the body and shadows from things like the blades and foils in the rear. Now, just to prove my point about “Final Gather Rays” not being the culprit in the amount of time taken as Resolution, I went ahead and bumped the ray count to 1000 from 200 and did another bake. The time was only 30 seconds longer than 2:04, and it looks identical if you ask me: 2mins, 34secs In this final lightmap attempt, the Final Gather Rays is set to 2000, and the Resolution is set to 250 texels. The total time was 28:54, but as you can see, the affect it has on the helicopter is very nice indeed. Notice the ambient occlusion on the hard angles as well as the yellow / green emission from the helicopter body and grass on the body where the tail and body come together as well as on the top rotors. The rotors from a top view look incredible as well, although, you’ll never see them during the game  Final Lightmapping - 28:54 Top view of rotors 250 texels 本文转自:http://blog.infrared5.com/
| 


 窥视卡
窥视卡 雷达卡
雷达卡 发表于 2012-12-19 20:19
 提升卡
提升卡 置顶卡
置顶卡 沉默卡
沉默卡 喧嚣卡
喧嚣卡 变色卡
变色卡 千斤顶
千斤顶 显身卡
显身卡