|
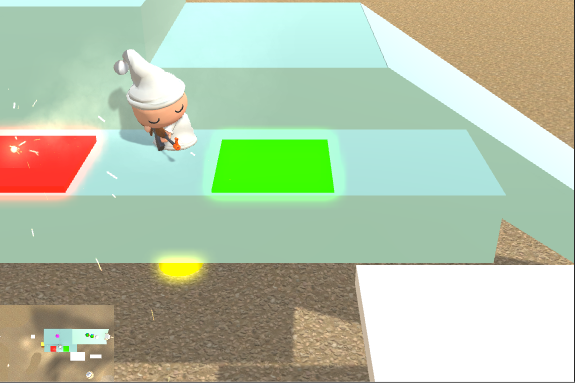
荧光效果截图:
一,接口: 整理完以后得到三个东西:AE_GroupBloom.cs,Camera_renderBloomRT.prefab,bloomEmitter.shader。 使用方法: 1,将AE_GroupBloom.cs添加到Main Camera上。 2,将Camera_renderBloomRT.prefab添加到场景中。并将Main Camera赋给其中的Main Camera Ref。 3,将发光物体的shader选为Custom/bloomEmitter。 这样就可以实现上面图中的效果。下面说具体代码。 二,实现原理: (注:我用的是unity5) AE_GroupBloom.cs代码如下: using UnityEngine;
using System.Collections;
public class AE_GroupBloom : MonoBehaviour {
public Material m_groupBloomMaterial;
void OnRenderImage(RenderTexture sourceTexture, RenderTexture destTexture){
////Debug.Log (destTexture);
//Copies source texture into destination render texture with a shader.
Graphics.Blit (sourceTexture, destTexture, m_groupBloomMaterial);
}
} Camera.OnRenderImage的官方文档中写道: OnRenderImage is called after all rendering is complete to render image. Postprocessing effects. It allows you to modify final image by processing it with shader based filters. The incoming image is source render texture. The result should end up in destination render texture. When there are multiple image filters attached to the camera, they process image sequentially, by passing first filter's destination as the source to the next filter. This message is sent to all scripts attached to the camera. Graphics.Blit的官方文档中写道: Copies source texture into destination render texture with a shader.
This is mostly used for implementing image effects. Blit sets dest as the render target, sets source _MainTex property on the material, and draws a full-screen quad.
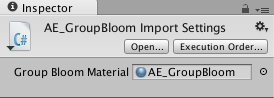
在此处由于脚本加在Main Camera上,所以OnRenderImage的sourceTexture就是Main Camera渲染的画面,destTexture就是Inspector中显示的Main Camera的Camera组件中的Target Texture属性,我们这里用其默认值None,表示直接渲染到屏幕(此时若在脚本中输出destTexture的值,结果为Null)(否则可以赋一个renderTexture,使此相机渲染到renderTexture上)。Graphics.Blit(sourceTexture, destTexture, m_groupBloomMaterail)的意思就是将Main Camera渲染的画面经过m_groupBloomMaterial中的shader过滤后传送到屏幕(而且sourceTexture会用作m_groupBloomMaterial的shader的_MainTex)。可见,这便是典型的后处理过程,m_groupBloomMaterial中的shder便是后处理shader。 (另外上面OnRenderImage的文档中还提到:如果相机上添加多个后处理脚本则会依次执行,而且前一个的destTexture用作下一个的sourceTexture,本例中尚且用不到这个)。 m_groupBloomMaterial是在脚本的setting中事先赋值好的(AE_GroupBloom.mat),如图:
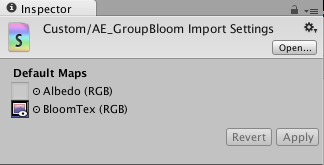
AE_GroupBloom.mat中的shader用的是Custom/AE_GroupBloom.shader,代码如下: Shader "Custom/AE_GroupBloom" {
Properties {
_MainTex ("Albedo (RGB)", 2D) = "white" {}
_BloomTex ("BloomTex (RGB)", 2D) = "white" {}
_BloomFactor("Bloom Factor",Range(0,10)) =2.0
}
SubShader { ZWrite Off //注意,这句和下一句对于iOS特别重要,如果没有这两句,在iOS真机上运行将会黑屏。
ZTest Always
Pass
{
CGPROGRAM
#pragma vertex vert
#pragma fragment frag
#pragma target 3.0
#include "UnityCG.cginc"
uniform sampler2D _MainTex;
uniform sampler2D _BloomTex;
float _BloomFactor;
v2f_img vert(appdata_img v) : POSITION {
v2f_img o;
o.pos=mul(UNITY_MATRIX_MVP, v.vertex);
o.uv=v.texcoord.xy;
return o;
}
fixed4 frag(v2f_img i):COLOR
{
//Get the colors from the RenderTexture and the uv's
//from the v2f_img struct
fixed4 mainColor = tex2D(_MainTex, i.uv);
fixed4 bloomColor= tex2D(_BloomTex, i.uv);
fixed4 finalColor =bloomColor*_BloomFactor+mainColor;
return finalColor;
}
ENDCG
}
}
FallBack "Diffuse"
}
前面说了_MainTex就是Main Camera渲染的画面,在shader中按如下公式进行合成: FinalTex=MainTex+BloomTex*BloomFactor 在本例中,我取的是BloomFactor=2. 即: 于是,现在剩下的问题就是BloomTex如何得到。 1,错误的方法: 最容易想到的办法就是把这些发光物体单独渲染到一个renderTexture上,然后作blur,即得到BloomTex。 只可惜这个方法是错误的,原因在于这种方法没考虑深度遮挡问题,如下图所示: 当发光物体被其它物体遮挡时,BloomTex上应该有相应的“缺口”。所以上面所述单独只将发光物体渲染一遍是错误的。 2,正确的方法: 知道了前面方法错在哪里,正确的方法自然也就有了。正确的方法是应该将所有物体都渲染一遍,并且对于所有非发光物体使用“纯黑”shader渲染,对于发光物体使用UnlitColor(颜色无光照)shader渲染,最后再blur,这样就能得到带“缺口”的BloomTex了。 具体实现如下: 新建一个RenderTexture命名为bloomRT(注意,由于我们并不需要深度信息,所以这个bloomRT可以选为No depth buffer,不会影响渲染到渲染效果),新建一个Camera命名为Camera_renderBloomRT。 在Inspector中将Camera_renderBloomRT的Camera组件的Target Texture赋为bloomRT。这样Camera_renderBloomRT就会把图像渲染到bloomRT上了。 为Camera_renderBloomRT添加脚本renderBloomRT(并在Inspector中将Main Camera赋给其中的m_mainCameraRef变量): using UnityEngine;
using System.Collections;
public class renderBloomRT : MonoBehaviour {
public Camera m_mainCameraRef;
public Shader m_renderBloomTexShader;
// Use this for initialization
void Start () {
GetComponent<Camera> ().enabled = false;//it is equals to uncheck Camera component in Inspector
synchronizePosAndRotWithMainCamera ();
synchronizeProjModeAndFrustomWithMainCamera ();
}
void LateUpdate () {
synchronizePosAndRotWithMainCamera ();
//Rendering with Replaced Shaders: http://www.cnblogs.com/wantnon/p/4528677.html
GetComponent<Camera>().RenderWithShader(m_renderBloomTexShader, "RenderType");
}
void synchronizePosAndRotWithMainCamera(){
transform.position=m_mainCameraRef.transform.position;
transform.rotation = m_mainCameraRef.transform.rotation;
}
void synchronizeProjModeAndFrustomWithMainCamera(){
GetComponent<Camera>().orthographic=m_mainCameraRef.orthographic;
GetComponent<Camera> ().orthographicSize = m_mainCameraRef.orthographicSize;
GetComponent<Camera> ().nearClipPlane = m_mainCameraRef.nearClipPlane;
GetComponent<Camera> ().farClipPlane = m_mainCameraRef.farClipPlane;
GetComponent<Camera> ().fieldOfView = m_mainCameraRef.fieldOfView;
}
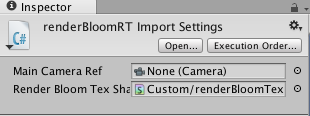
} 此脚本做了三件事儿: 1,将Camera_renderBloomRT的camera组件disable掉(相当于在inspector中将camera组件前面的勾去掉)。 2,让Camera_renderBloomRT的position和rotation与Main Camera始终保持一致。 3,调用GetComponent<Camera>().RenderWithShader(m_renderBloomTexShader, "RenderType")进行渲染(渲染到bloomRT上)。 m_renderBloomTexShader是在脚本的setting中事先赋好的(Custom/renderBloomTex.shader),如图:
renderBloomTex.shader代码如下: Shader "Custom/renderBloomTex" {//modified from "Unlit/Color"
Properties {
_Color ("Main Color", Color) = (1,1,1,1)
}
SubShader { //this subShader is same with "Unlit/Color" shader, except the RenderType change to "GroupBloom"
Tags { "RenderType"="GroupBloom" }
LOD 100
Pass {
CGPROGRAM
#pragma vertex vert
#pragma fragment frag
#pragma multi_compile_fog
#include "UnityCG.cginc"
struct appdata_t {
float4 vertex : POSITION;
};
struct v2f {
float4 vertex : SV_POSITION;
UNITY_FOG_COORDS(0)
};
fixed4 _Color;
v2f vert (appdata_t v)
{
v2f o;
o.vertex = mul(UNITY_MATRIX_MVP, v.vertex);
UNITY_TRANSFER_FOG(o,o.vertex);
return o;
}
fixed4 frag (v2f i) : COLOR
{
fixed4 col = _Color;
UNITY_APPLY_FOG(i.fogCoord, col);
UNITY_OPAQUE_ALPHA(col.a);
return col;
}
ENDCG
}
}
SubShader { //because this subShader renders pure black, so we need not support fog
Tags { "RenderType"="Opaque" }
LOD 100
Pass {
CGPROGRAM
#pragma vertex vert
#pragma fragment frag
#include "UnityCG.cginc"
struct appdata_t {
float4 vertex : POSITION;
};
struct v2f {
float4 vertex : SV_POSITION;
};
fixed4 _Color;
v2f vert (appdata_t v)
{
v2f o;
o.vertex = mul(UNITY_MATRIX_MVP, v.vertex);
return o;
}
fixed4 frag (v2f i) : COLOR
{
fixed4 col = float4(0,0,0,1);
return col;
}
ENDCG
}
}
}
此shader的第一个subShader与unity5内置的"Unlit/Color"shader完全相同,只是将"RenderType"="Opaque"改成了"RenderType"="GroupBloom"。第二个subShader则是将所渲染的像素都弄成纯黑色,其标签仍使用"RenderType"="Opaque"。 当调用GetComponent<Camera>().RenderWithShader(m_renderBloomTexShader, "RenderType"),系统将会对所有含有"RenderType"="Opaque"标签的物体使用第二个subShader进行渲染(渲染成纯黒色),而对所有含有"RenderType"="GroupBloom"标签的物体使用第一个subShader进行渲染(Unlit+Color)。 于是接下来我们就清楚该怎么做了,就是: 1,保证所有想渲染成纯黑色的物体带有"RenderType"="Opaque"标签,这个基本上是自然保证的,因为unity里物体的默认shader都带有"RenderType"="Opaque"标签。 2,保证所有想渲染为Unlit+Color的物体带有"RenderType"="GroupBloom",这个需要我们手动去添加,或者更有条理的办法是创建一个标准shader,命名为“Custom/bloomEmitter”,并为其添加"RenderType"="GroupBloom"标签,然后对于所有的发光物体,都使用此shader。 至此我们就将发光物体与不发光物体以不同的replace shader渲染到bloomRT上了,得到bloomRT如下:
然后再把standard assets中的blur脚本添加到Camera_renderBloomRT上,得到bloomRT如下:
至此bloomRT已完成,我们在AE_GroupBloom.shader的setting中事先将bloomRT赋给BloomTex分量。即bloomRT就是BloomTex。
我们还应该为Camera_renderBloomRT添加下面脚本letRenderTextureAspectEqualsToScreenAspect.cs: using UnityEngine;
using System.Collections;
public class letRenderTextureAspectEqualsToScreenAspect : MonoBehaviour {
public RenderTexture m_rt;
// Use this for initialization
void Start () {
float screenAspect = (float)(Screen.width) / Screen.height;
////Debug.Log (screenAspect);
m_rt.width = (int)(m_rt.height*screenAspect);
}
} 并将bloomRT通过Inspector赋给m_rt. 这样在游戏开发执行时在保持bloomRT的高度不变的前提下重设其宽度,使bloomRT的长宽比与屏幕的长宽比相等,从而保证bloomRT能够正确地与原始游戏画面进行合成。 另外需要注意的是bloomRT的尺寸不必与屏幕相等,出于效率考虑bloomRT的尺寸应在能保证视觉效果可接受的前提下尽可能地小。越小越好。 最后将Camera_renderBloomRT做成prefab。 (完)
| 


 窥视卡
窥视卡 雷达卡
雷达卡 发表于 2018-8-23 17:51


 提升卡
提升卡 置顶卡
置顶卡 沉默卡
沉默卡 喧嚣卡
喧嚣卡 变色卡
变色卡 千斤顶
千斤顶 显身卡
显身卡 发表于 2018-9-17 12:56